![]()
Troubleshooting 700 Series Routers
Faxback Document #700_console |
Troubleshooting a 700 series router requires a console connection. With a console, status messages from the router may be read and commands into the router may be entered. |
The installation of a Cisco 700 Series Router is usually a simple task once the ISDN line has been properly installed and provisioned by the telco. However, if the ISDN connection does not operate as expected, proven techniques can be applied to recognize and solve common problems. The task of troubleshooting an ISDN connection can be organized into three easy steps. Each step includes sample router output messages and walks through detailed suggestions to troubleshoot a problem scenario.
Faxback Document #700_faq |
For problems outside the scope of this document, check this collection of frequently asked questions about 700 series routers. |
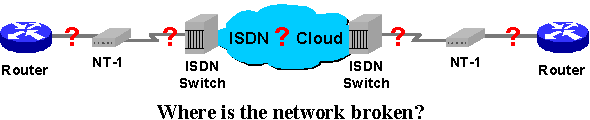
Step 1: Verify Physical Connections
Troubleshooting begins by verifying that the router is in an operational state and has good physical LAN and ISDN connections.
Upon power up, the Cisco 700 series router performs a series of power on self tests (POST) to verify hardware and software operation. The following is an illustration of a proper boot sequence.
BOOT version 2.0(1) 04/16/96 14:48
Copyright (c) 1993-1996. All rights reserved.

POST ............ OK.
Validating FLASH ... OK.
Booting up .............................
01/01/1995 00:00:00  Connection 1 Opened
> 01/01/1995 00:00:00 L01 0              Started Operation
> 01/01/1995 00:00:00 L02 0              Line Activated
> 01/01/1995 00:00:00 L18 1              Terminal Identifier Assigned
If the router is booting properly, proceed to verify the physical LAN connection. If the router fails to boot, an indication of the failure will be displayed on the console. The following illustrates that a user is prompted to reload the software image onto the router if it is corrupted.
POST ............ OK.
Validating FLASH
Ready to upload new firmware into flash.  Select baud rate:

    1 -    300 baud
    2 -   1200 baud
    4 -   4800 baud
    5 -   9600 baud
    6 -  19200 baud
    7 -  38400 baud
    8 -  57600 baud
    9 - 115200 baud
Loading Software
Faxback Document #700_swlInstructions on loading software images onto a 700 series router through a console connection.
Verify Physical LAN Connection
A proper ethernet connection is indicated by a link status light. Cisco 700 series routers supply link status LEDs on the front panel of 770 models and on the back panel of 760 models. The absence of a link light indicates a physical connection problem. If the LAN link status is good, proceed to verify the physical ISDN connection.
Suggestions for solving ethernet connection problems
- Make certain that network connections are inserted securely into network devices.
- Verify that the proper cable type (straight-through or crossover) is used. 770 series models function as a hub whereas 760 series models can be toggled to function as either a hub or a node with a dipswitch. Table 1 provides a summary of cabling rules.
- The problem may be a faulty ethernet cable; try using another cable.
Table 1 - Cabling Rules Hub Node Hub Crossover Straight Node Straight Crossover
Table 2 - Ethernet Cable Pinouts Straight Crossover 1 -- 1
2 -- 2
3 -- 3
6 -- 61 -- 3
2 -- 6
3 -- 1
6 -- 2
Verify Physical ISDN Connection
700 series routers indicate the physical status of an ISDN connection with two LEDs on the front panel. The NT1 light (North America only) indicates successful network termination/synchronization and the LINE light indicates proper data framing. NT1 and LINE lights must be solid for proper ISDN termination. If the lights are solid, proceed to step 2.
Suggestions for solving layer 1 ISDN problems
- In North America, an NT1 device is required to connect to the ISDN cloud. Cisco 762, 766, 772, and 776 router models supply an integrated NT1 on the router. On these models, confirm that the cable between the router U interface and the ISDN wall socket is securely fastened. If a non-integrated NT1 model is used (i.e. 761, 765, 771, or 775), an external NT1 device must be supplied. In this case, confirm that the cable between the router S/T interface and the NT1 S/T interface is securely fastened and the cable between the NT1 U interface and the ISDN wall socket is securely fastened.
- Outside of North America, confirm that the cable between the router S/T interface and the ISDN wall socket is securely fastened.
- The problem may be related to a faulty cable; try replacing the ISDN cable.
- Contact the ISDN provider to verify that the ISDN line has been correctly installed and activated.
| Quick link to the 700 Series Router Installation Guide for more details on LED indicators. |
Step 2: Verify Layer 2 Addressing
Once it is verified that the router successfully boots and has good physical LAN and ISDN connections, steps can be taken to insure that layer 2 addressing is functioning properly.
The "show address" command verifies which network devices the router can "see." Each device on the LAN is uniquely identified by a hardware (MAC) address. This command displays the MAC addresses from which the router has received traffic and also indicates the profile on which the address was learned. For example, the word LAN indicates that the corresponding MAC address appears on the LAN profile.
> sh address
 INT 00 40 f9 12 d5 d8  Static
 LAN 00 aa 00 0d 1f d5  Age:       1914
 LAN 00 aa 00 0d 1f e5  Age:         56
 LAN 00 aa 00 0d 1f c3  Age:          2
 LAN 00 aa 00 0e 22 cf  Age:        120
 LAN 00 aa 00 0c 55 a3  Age:          1

Number of Ethernet Addresses: 6
IP Address: 10.0.0.1
Ethernet Address: 00 40 f9 12 d5 d8
Subnet Mask: 255.255.255.240
Default Gateway: 0.0.0.0
IPX Default Gateway:  NONE
SAP Helper:  NONE
Command Reference
More details on the show address command.
If the show address command correctly displays all network devices, proceed to verify the ISDN SPID and TEI assignment.
Suggestions for solving MAC addresses learning problems
- Most likely a physical connection problem still exists on the LAN even if the link light indicates a physical connection. There are instances in which a cable may be functioning enough to provide the voltage to trigger a link light, but not transfer data. Try changing the cable.
- It is possible the connection is broken elsewhere on the network. Make sure all devices have link to the network.
Note: If the router learns only four MAC addresses from the LAN when more than four LAN devices exist, an upgrade to the Remote Office feature set is required. Software images other than the Remote Office feature set are limited to a maximum of four users on the LAN segment. Problems such as intermittant connections or connectivity for some but not all workstations may surface if the Remote Office feature set is not used.
Verify ISDN SPID And TEI Assignment
The router indicates the registration of the SPIDs and TEI assignment upon initial SPID configuration and upon subsequent reboots. For instance, the following output is displayed:
> 01/01/1995 00:01:48  L18  1               Terminal Identifier Assigned
> 01/01/1995 00:01:48  L22  1 40855512120101  Sending SPID
> 01/01/1995 00:01:48  L18  2               Terminal Identifier Assigned
> 01/01/1995 00:01:48  L23  1 40855512120101  SPID Accepted
> 01/01/1995 00:01:48  L22  2 40855513130101  Sending SPID
> 01/01/1995 00:01:49  L23  2 40855513130101  SPID Accepted
Note: For 5ESS Custom Point-To-Point ISDN switch-types, SPIDs are not necessary and must NOT be configured. If SPIDs are configured, the router will not function.
If SPIDs and TEI are assigned correctly, proceed to make a test call.
The router will indicate if a SPID is rejected.> 01/01/1995 00:00:13 L22 1 40855514140101 Sending SPID > 01/01/1995 00:00:15 L24 1 SPID Rejected Cause 100 Invalid Information Element Contents
Suggestions for successful SPID acceptance and TEI assignment
- Verify the switch-type with the ISDN provider and correspondingly configure the router using the "set switch" command.
- In North America, verify the SPID format with the ISDN provider and correspondingly configure the router using the "set spid" command. Also, check with the ISDN provider if extra TID digits are required and append these to the SPID (i.e. "0101").
- For North America, 4.1.1 and greater software versions for 700 series routers support automatic SPID and ISDN switch-type detection. To utilize this feature, perform the following tasks:
- Clear out existing SPID and directory number configurations
> set 1 spid > set 2 spid > reset directory all- Verify the seven digit directory numbers with the ISDN provider and reconfigure the directory numbers
> set 1 directory B1directory# > set 2 directory B2directory#- Make sure auto SPID negotiation is turned on (on by default)
> set autodetection on- Reboot router
> reboot
As a final test, the 700 series router can place a call to itself. A call can be looped from the router's B1 channel to the router's B2 channel using the "call" command.
To make a test call:
- Disable PPP authentication
> set ppp authentication in none- Place a call
> call 1 B2directory#Note: Don't forget to reenable authentication when finished with call testing. Use the "set ppp authentication in CHAP or PAP command.
A sample successful test call is displayed below.
> ca 1 5551313
> 01/01/1995 00:01:57  L05  0      5551313  Outgoing Call Initiated
> 01/01/1995 00:01:58  L11  2   4085551212  Call Requested
> 01/01/1995 00:01:58  L14  2               Accepting Call
> 01/01/1995 00:01:58  L08  2   4085551212  Call Connected
> 01/01/1995 00:01:58  L08  1      5551313  Call Connected
> 01/01/1995 00:01:59  Connection 1 Add     Link 1 Channel 1
> 01/01/1995 00:01:59  Connection 1 Add     Link 2 Channel 2
Call status is also monitored using the "show status" command. Physical ISDN termination is also indicated by the "line activated" field. In addition, SPID and TEI status are also displayed.
> show status
Status    01/01/1995 00:02:03
Line Status
  Line Activated <== ISDN termination
  Terminal Identifier Assigned   SPID Accepted <== SPID and TEI
Port Status                                 Interface Connection Link
  Ch:  1   64K Call In Progress  5551313     DATA          1       1
  Ch:  2   64K Call In Progress  4085551212  DATA          2
  call status ^
If the router can successfully call itself, proceed to step 3. The router will display a message similar to the following if unsuccessful.
> 01/01/1995 00:02:03  L05  0       5551313 Outgoing Call Initiated
> 01/01/1995 00:02:04  L12  0               Disconnected Remotely
Cause 50  Requested Facility not Subscribed
Suggestions for a router to successfully call itself
- Verify directory numbers with the ISDN provider and correspondingly configure the router using the "set directory" command. The router will not answer incoming calls until correct directory numbers are configured.
- Verify that the dialed phone number is correct. In some cases, dialing plans may be active (i.e. Centrex).
- Invalid SPID registration can cause connection failures. This is normally indicated by an ISDN cause code (i.e. Cause 50 in the above illustration). Infrequently, an incorrect SPID may still show up as accepted. Verify the SPID format with the ISDN provider and correspondingly configure the router using the "set spid" command. Also check if extra TID digits are required and append these to the SPID.
- Verify that the ISDN line has been properly provisioned and activated by the ISDN provider.
Faxback Document #700_provisioning |
Details on ISDN line provisioning. |
Step 3: Verify PPP Negotiation
Once layer 2 addressing is functional and the 700 series router can place a call to itself, the final step is to insure that PPP negotiation to the remote destination completes successfully. For this to happen, a complete and correct configuration on the router is essential. It is bly recommended to compare the router's configuration against a similar example configuration first to make sure the router is configured properly. 90% of PPP problems are solved with proper router configuration.
| A collection of 700 series router sample configurations along with detailed explanations of the commands. |
When a call connects to a remote site, the "show negotiation all" command can be used to display which layers of PPP have successfully negotiated. An example output is included below.
> sh negotiation all
System Parameters
    PPP Negotiation Parameters
      Integrity Interval        10
      Retry Count               10
      Retry Interval            3000
      Terminate Count           2
      Multilink                 ON

Profile Parameters
      Compression               STAC
      BACP                      ON
      Address Negotiation Local OFF


Negotiated Parameters
      Connection   1            Virtual
      Connection   2            PPP IPCP CCP <= negotiated layers
Quick link to the 700 Series Router Command Reference for more details on the show negotiation command
If a desired layer is not negotiated or if the call does not connect, the most useful tool to examine PPP negotiation is the "diag ppp" command. This command displays PPP negotiation mesages for the different layers of PPP. Example outputs of successful negotiations are supplied for supported layers of PPP along with explanations of important fields. Comparison of unsuccessful PPP sessions against these examples offer insight into isolating the PPP problem.
To utilize the PPP diagnostic tool, perform the following:
> diag ppp on
> cd user profile
:user> call
Note: To disable PPP diagnostic messages, use the "diag ppp off" command.
Link Control Protocol (LCP) Layer Negotiation
ppp: Physical layer up
  ISDN link is up
ppp: lcp: event up
ppp: lcp: FSA st=Initial; ev=Up; ac=nop,nop,nop; nx=Closed
ppp: open event
  Begin PPP negotiation
ppp: lcp: event open
  Start LCP layer negotiation
ppp: lcp: FSA st=Closed; ev=Open; ac=ico,irc,scr; nx=ReqSent
ppp: lcp: ico - initialize configuration
ppp: lcp: irc - init restart counter
ppp: lcp: scr - send conf-req
  Begin configuration request sent to opposite site
ppp: MRU 1522
    Request Maximum Receive Unit = 1522
ppp: AuthProt CHAP hash MD5
    Request CHAP authentication protocol
ppp: MagicNum 001010A4 Sending Magic number
ppp: PFC
ppp: ACFC
ppp: MRRU 1800
ppp: ShortSequenceNumber
ppp: EPD
    Request EPD (End Point Discriminator) for multilink negotiation
ppp: lcp: recv conf-req
  Begin configuration request received from opposite site
ppp: ack option MRU 1522
    Receive Maximum Receive Unit = 1522 request
ppp: ack option AuthProt CHAP
    Receive CHAP authentication protocol request
ppp: ack option MagicNum 0xDB1429E3
ppp: ack option PFC
ppp: ack option ACFC
ppp: ack option MRRU 1800
ppp: ack option ShortSeqNum
ppp: ack option EPD Class 3, Mac Address: 0:40:F9: 9:C8:3C
    Receive EPD request and MAC address of opposite router
ppp: lcp: FSA st=ReqSent; ev=RCR+; ac=sca,nop,nop; nx=AckSent
ppp: lcp: sca - send conf-ack
  Send configuration ACKs to opposite site
ppp: lcp: recv conf-ack
  Begin configuration ACKs received from opposite site
ppp: MRU 1522
    Receive MRU = 1522 ACK
ppp: AuthProt CHAP hash MD5
    Receive CHAP authentication protocol ACK
ppp: MagicNum 001010A4
ppp: PFC
ppp: ACFC
ppp: MRRU 1800
ppp: ShortSequenceNumber
ppp: EPD
ppp: lcp: FSA st=AckSent; ev=RCA; ac=irc,tlu,nop; nx=Opened
ppp: lcp: irc - init restart counter
ppp: lcp: tlu - this layer up
  LCP layer is successfully negotiated

ppp: lcp: recv echo req
ppp: lcp: FSA st=Opened; ev=RXR; ac=ser,nop,nop; nx=Opened
ppp: lcp: ser - send echo reply
  The above three lines represent LCP link integrity checks and repeat
  periodically during the PPP session
Suggestions for LCP negotiation
|
Challenge Handshake Authentication Protocol (CHAP) Negotiation
ppp: chap: authenticator start
ppp: send chal
  Send CHAP challenge to opposite site
ppp: chap: authenticatee start
ppp: recv chal
  Receive authentication challenge from opposite site
ppp: chap: send resp
  Send CHAP response to opposite site
ppp: chap: recv resp
  Receive CHAP response from opposite site
ppp: send success
  Send CHAP success to opposite site
ppp: recv success
  Receive CHAP success from opposite site
ppp: chan 1 conn'd
01/01/1995 02:00:38 Connection 2 Add Link 1 Channel 1
  Authentication passed and connection established
Suggestions for CHAP or PAP negotiation |
| Details on PPP: CHAP vs. PAP authentication and unidirectional vs. bidirectional authentication |
Compression Control Protocol (CCP) Negotiation
ppp: ccp: event up
ppp: ccp: FSA st=Initial; ev=Up; ac=nop,nop,nop; nx=Closed
ppp: ccp: event open
  Start CCP negotiation
ppp: ccp: FSA st=Closed; ev=Open; ac=ico,irc,scr; nx=ReqSent
ppp: ccp: ico - initialize configuration
ppp: ccp: irc - init restart counter
ppp: ccp: scr - send conf-req
  Begin CCP configuration request sent to opposite site
ppp: CompressionTypeSTACLZS
    Request STAC compression
ppp: ccp: recv conf-req
  Begin CCP configuration request received from opposite site
ppp: ack option StacLZS history count 1 check mode 1
    Receive STAC compression request
ppp: ccp: FSA st=ReqSent; ev=RCR+; ac=sca,nop,nop; nx=AckSent
ppp: ccp: sca - send conf-ack
  Send CCP configuration ACK to opposite site
ppp: ccp: recv conf-ack
  Begin CCP configuration ACK received from opposite site
ppp: CompressionTypeSTACLZS
    Receive STAC compression ACK
ppp: ccp: FSA st=AckSent; ev=RCA; ac=irc,tlu,nop; nx=Opened
ppp: ccp: irc - init restart counter
ppp: ccp: tlu - this layer up
  CCP successfully negotiated
Suggestions for CCP negotiation
|
Bridge Control Protocol (BCP) Negotiation
ppp: bcp: event up
ppp: bcp: FSA st=Initial; ev=Up; ac=nop,nop,nop; nx=Closed
ppp: bcp: event open
  Start BCP layer negotiation
ppp: bcp: FSA st=Closed; ev=Open; ac=ico,irc,scr; nx=ReqSent
ppp: bcp: ico - initialize configuration
ppp: bcp: irc - init restart counter
ppp: bcp: scr - send conf-req
  Begin BCP configuration request sent to opposite site
ppp: MacSupport: IEEE 802.3/Ethernet
    Request MAC layer IEEE 802.3 protocol
ppp: bcp: recv conf-req
  Begin BCP configuration request received from opposite site
ppp: ack option MacSupport: IEEE 802.3/Ethernet
    Receive MAC Layer IEEE 802.3 protocol request
ppp: bcp: FSA st=ReqSent; ev=RCR+; ac=sca,nop,nop; nx=AckSent
ppp: bcp: sca - send conf-ack
  Send BCP configuration ACK to opposite site
ppp: bcp: recv conf-ack
  Begin BCP configuration ACK received from opposite site
ppp: MacSupport: IEEE 802.3/Ethernet
    Receive MAC layer IEEE 802.3 protocol ACK
ppp: bcp: FSA st=AckSent; ev=RCA; ac=irc,tlu,nop; nx=Opened
ppp: bcp: irc - init restart counter
ppp: bcp: tlu - this layer up
  BCP successfully negotiated
Suggestions for BCP negotiation
|
Internet Protocol Control Protocol (IPCP) Negotiation
ppp: ipcp: event up
ppp: ipcp: FSA st=Initial; ev=Up; ac=nop,nop,nop; nx=Closed
ppp: ipcp: event open
  Start IPCP Negotiation
ppp: ipcp: FSA st=Closed; ev=Open; ac=ico,irc,scr; nx=ReqSent
ppp: ipcp: ico - initialize configuration
ppp: ipcp: irc - init restart counter
ppp: ipcp: scr - send conf-req
  Begin IPCP configuration request sent to opposite site
ppp: Address: 172.16.1.1
    Request IP address 172.16.1.1
ppp: ipcp: recv conf-req
  Begin IPCP configuration request received from opposite site
ppp: ack option Address: 172.16.1.2
    Receive request for IP address 172.16.1.2
ppp: ipcp: FSA st=ReqSent; ev=RCR+; ac=sca,nop,nop; nx=AckSent
ppp: ipcp: sca - send conf-ack
  Send IPCP ACK to opposite site for IP address 172.16.1.2
ppp: ipcp: recv conf-ack
  Begin IPCP ACK received from opposite site
ppp: Address: 172.16.1.1
    Receive ACK of IP address 172.16.1.1
ppp: ipcp: FSA st=AckSent; ev=RCA; ac=irc,tlu,nop; nx=Opened
ppp: ipcp: irc - init restart counter
ppp: ipcp: tlu - this layer up
  IPCP negotiated successfully
Suggestions for IPCP negotiation
|
Internetwork Packet Exchange Control Protocol (IPXCP) Negotiation
ppp: ipxcp: event up
ppp: ipxcp: FSA st=Initial; ev=Up; ac=nop,nop,nop; nx=Closed
ppp: ipxcp: event open
  Start IPXCP Negotiation
ppp: ipxcp: FSA st=Closed; ev=Open; ac=ico,irc,scr; nx=ReqSent
ppp: ipxcp: ico - initialize configuration
ppp: ipxcp: irc - init restart counter
ppp: ipxcp: scr - send conf-req
  Begin IPXCP configuration request sent to opposite site
ppp: Net-Num: AAAA
    Request IPX network = AAAA
ppp: Node: 0040f911590f
    Request IPX node address = 0040f911590f
ppp: ipxcp: recv conf-req
  Receive IPXCP configuration request from opposite site
ppp: ipxcp: FSA st=ReqSent; ev=RCR+; ac=sca,nop,nop; nx=AckSent
ppp: ipxcp: sca - send conf-ack
  Send IPXCP configuration ACK to opposite site
ppp: ipxcp: recv conf-ack
  Begin IPXCP configuration ACK received from opposite site
ppp: Net-Num: AAAA
    Receive IPX network number = AAAA ACK
ppp: Node: 0040f911590f
    Receive IPX node address = 0040f911590f
ppp: ipxcp: FSA st=AckSent; ev=RCA; ac=irc,tlu,nop; nx=Opened
ppp: ipxcp: irc - init restart counter
ppp: ipxcp: tlu - this layer up
  IPXCP negotiated successfully
Suggestions for IPXCP negotiation
|
Conclusion
At this point, the ISDN call should connect properly to the opposite site. The desired PPP layers should be shown to have successfully negotiated with the "show negotiation all" command. If problems still persist, the problem may be protocol related. Protocol level troubleshooting is handled in documents targeted at the specific protocol.
Faxback Document #700_tsindex |
Troubleshooting index for more troubleshooting help. |
All contents copyright © Cisco Systems, Inc. Important notices.