![]()
For Cisco 2509-2512, 3600 16/32 Asynchronous Network Module, and 4000
2 Serial 16 Async/Sync Network Processor Module, there are two cables available
for connection to the modems. The first is the CAB-OCTAL-MODEM= (product
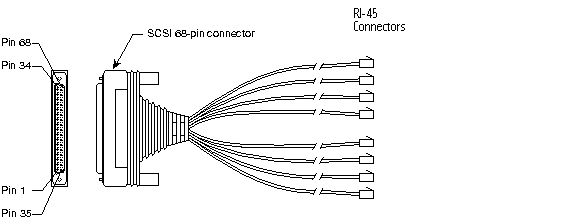
number CAB-OCTAL-MODEM). This cable has a male DB-68 (SCSI II) connector
on the Cisco end and eight RJ-45 connectors on the network end that are
hard-wired into eight DB-25 modular adapters.

The second cable is the CAB-OCTAL-KIT= (product number CAB-OCTAL-KIT).
This cable has a male DB-68 (SCSI II) connector on the Cisco end and eight
RJ-45 connectors on the network end that are connected into eight DB-25
modular adapters (CAB-25AS-MMOD). The RJ-45 connectors are not hard-wired
into the DB-25 modular adapters.
The MODEM modular adapter (CAB-25AS-MMOD) is used to convert the RJ45 to a DB25 male connector on CAB-OCTAL-KIT= and on a rolled RJ-45 cable.

When connecting to a RJ-45 AUX port, use a rolled RJ45 to RJ45 cable with the MODEM adapter (CAB-25AS-MMOD). To identify a rolled RJ-45 cable, hold the two ends of the cable next to each other so that you can see the colored wires inside the ends, as shown here:

The colored wires at one end of the cable are in the reverse sequence of the colored wires at the other end of the cable. The pinouts for a rolled cable are:
1 - 8
2 - 7
3 - 6
4 - 5
5 - 4
6 - 3
7 - 2
8 - 1
When connecting to a DB-60 sync/async port on a 2520-2523, 1005, 1600, 3600, or 4000 series router, use CAB-232MT= (product number 72-0793-01). This cable has a male DB-60 connector on the Cisco end and a male DB-25 connector on the network end.
![]()
When connecting to the DB-25 AUX port on a 4000 series router, use a straight DB-25 to DB-25 cable. There is no Cisco part number or product number for this cable.
![]()
Step 2: Checking the line connection:
When the router is configured for dialin access and the modem is properly connected and configured, the "show line" output will typically look like this:
Atlanta#sho line aux 0

Tty     Typ     Tx/Rx           A       Modem   Roty    AccO    AccI    Uses    Noise   Overruns
9       AUX     38400/38400     -       inout   -       -       -       0       2       0/0

Line 9, Location: "", Type: ""
Length: 24 lines, Width: 80 columns
Baud rate (TX/RX) is 38400/38400, no parity, 1 stopbits, 8 databits
Status: No Exit Banner
Capabilities: Hardware Flowcontrol In, Hardware Flowcontrol Out
Modem Callout, Modem RI is CD
Modem state: Idle
Special Chars: Escape   Hold    Stop    Start   Disconnect      Activation
                   ^^x  none    -       -       none
Timeouts:          Idle EXEC Idle Session       Modem Answer    Session Dispatch
                   00:10:00      never                          none    not set
Modem type is unknown.
Session limit is not set.
Time since activation: never
Editing is enabled.
History is enabled, history size is 10.
Full user help is disabled
Allowed transports are pad v120 telnet rlogin. Preferred is telnet.
No output characters are padded
No special data dispatching characters
Modem hardware state: CTS* noDSR DTR RTS
Note: The last line of the show line x command is the Modem hardware state. CTS and DSR are signals supplied by the modem. DTR and RTS are signals provided by the router. When waiting for a call, the router will have DTR and RTS high. The modem will have CTS high. DSR is not supplied until there is a valid connection. When there is a valid connection, the modem will raise its DCD signal, which the router sees as DSR. Once DSR is raised, the line is activated and the connection process starts.
Step 3: Talking to the modem:
There are two ways of talking to the modem to verify local communication and to configure the modem;
To get a successful reverse telnet, you must meet the following conditions:
1. The show line output must read:
Modem state: Idle
Modem hardware state: CTS* noDSR DTR RTS
(or)
Modem hardware state: noCTS* noDSR DTR RTS
2. The line must have "modem InOut" configured.
3. A valid IP address must be available.
From the router EXEC prompt, telnet to a valid ip address on the router + 200x, where x is the absolute line number. For example, on a 2509 router, 2001 would be the first physical line, 2005 would be the fifth physical line, and 2009 would be the aux port.
Ex:     Atlanta#telnet 10.1.1.1 2009

        this command will connect to the AUX port on a 2509.
Once connected via a reverse telnet, communicate with the modem via standard AT commands. Send the appropriate AT initialization string to the modem and save. To terminate the reverse telnet session, issue the escape sequence, <Ctrl> <Shift> <6> to suspend the session and then <x> to return to the EXEC prompt, then issue "disc" to terminate the session.
If the modem does not respond to AT commands, try typing ATE1Q0. This will enable echo and result codes on the modem. Try displaying the configuration of the modem with an AT&V or ATI4 command. Even if the modem is set to echo off and no result codes, it will still display the configuration if you are communicating correctly.
If there is still no response, verify that the DTE speed is set correctly. The modem may be locked in at a specific DTE rate different than the one specified under the line setting. Terminate the reverse telnet session. Reset the line speed and clear the line. Attempt the reverse telnet again. Try different speeds if the modem will not respond. If after trying different line speeds and the modem still will not respond, connect it directly to a PC running a terminal program and verify the modem is operational.
If the router returns the error "Connection refused by remote host", verify that the line is not in use. Clear the line and try again. Verify that the modem is not forcing DSR/DCD high by using the "show line" command to view the modem hardware state. If DSR is present, then the modem is forcing DSR/DCD high. Turn off the modem and then reverse telnet to the port. Once connected, turn the modem back on and try sending the AT initialization string.
Chat-script method:
1. Define a chat script to send the appropriate AT initialization string.
2. Turn on the chat debug with the command "debug chat".
3. From the enabled mode, enter the command "start <chat-script name> <line> ".
Ex:     Atlanta#start rstmdm aux 0
        this command will start the chat-script named rstmdm on the AUX port.
Here is a successful chat-script initialization:
Atlanta#start rstmdm aux 0
Atlanta#
CHAT9: Matched chat script rstmdm to string rstmdm
CHAT9: Asserting DTR
TTY9: Set DTR to 1
CHAT9: Chat script rstmdm started
CHAT9: Sending string: at&fs0=1&c1&d2&h1&r2&b1&m4&k1&w
CHAT9: Expecting string: OK
CHAT9: Completed match for expect: OK
CHAT9: Chat script rstmdm finished, status = Success
TTY9: DSR was dropped
tty9: Modem: READY->HANGUP
TTY9: dropping DTR, hanging up
TTY9: Set DTR to 0
tty9: Modem: HANGUP->IDLE
TTY9: restoring DTR
TTY9: Set DTR to 1
If the chat-script fails, verify that the chat-script is written properly. The chat-script works in an EXPECT SEND format. If the response back from the modem is not EXACTLY what the chat-script is expecting, then it will fail.
Verify that the line speed is also correct. The modem may be locked in at a different DTE speed that specified in the line settings. Fall back to the reverse telnet method if the chat-script method fails.
Step 4: Verifying dial-in character mode access:
There are two types of dial-in connections a Cisco access server will accept, character mode and packet mode. A character mode connection is when the router starts an EXEC session on the line. A packet mode connection is when the router starts a PPP/SLIP/ARAP session on the line.
Before attempting a packet mode session, test the access server for character mode operation. This will verify that the access server’s line configuration and modem are configured correctly.
To perform the test, you will need a workstation running a terminal communications package, or a dumb terminal, and a modem.
First verify that the access server’s line and async interface are configured per the sample configs.
Then from the workstation or terminal, dial into the access server’s modem. After the modem connection is made, press the <ENTER> or <RETURN> key on the remote terminal. The access server will prompt for a username and password. Once authenticated, the access server will start an EXEC process on the line. From here, the remote user can perform any of the commands allowed from the console port.
If the access server does not prompt for a username/password, turn on "debug modem" and call in again. The debug output should look like this:
Atlanta#
TTY9: DSR came up
tty9: Modem: IDLE->READY
TTY9: Autoselect started
TTY9: Autoselect starting EXEC
TTY9: EXEC creation
The first line, TTY9: DSR came up, shows that the modem made a valid connection and has raised DSR/DCD.
The second and third line shows that the access server activates the line and samples the incoming data to see what type of connection is being made.
The fourth line shows that the access server see the incoming <ENTER>/<RETURN> and knows that this is a character based session.
The fifth line shows the access server starting an EXEC process and prompts the dial-in user for a username/password.
If there are any problems with character based dial-in access, verify the line config and the modem connections as described in the steps above.
Debugging PPP Packet mode connections:
To debug dial-in PPP Packet mode connections, please see the PPP troubleshooting page.
All contents copyright © Cisco Systems, Inc. Important notices.